
0
Owner's of the Casio Electronic Keyboard Digital Piano gave it a score of 0 out of 5. Here's how the scores stacked up:


E-39
English
Getting Ready
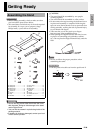
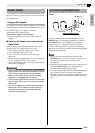
PREPARATION
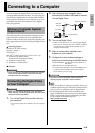
• Before starting assembly, check to make sure that
you have all the parts shown below.
• This stand does not include any of the tools required
for assembly. It is up to you to prepare a large
Philips head (+) screwdriver for assembly.
IMPORTANT!
• Do not use any screws other than those that come
with the stand. Doing so risks damage to the stand
and/or Digital Piano.
• You can find the screws in a plastic bag inside of the
packing material.
• If anything is missing or damaged, contact your local
CASIO service provider.
*CAUTION
• The stand should be assembled by two people
working together.
• The stand should be assembled on a flat surface.
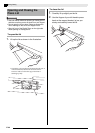
• Do not remove the tape securing the keyboard cover
in place until assembly is complete. Removing the
tape can cause the keyboard cover to open and close
during assembly, creating the risk of personal injury
to your hands and fingers.
• Take care that you do not pinch your fingers
between parts when assembling them.
• When placing the Digital Piano on the floor, be sure
to place it on something soft (a blanket, cushion,
etc.). Do not place the Digital Piano directly onto the
floor.
NOTE
• Be sure to follow the proper procedure when
assembling the stand.
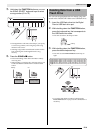
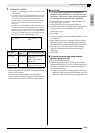
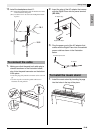
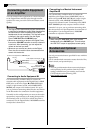
PREPARATION
• Pull the pedal unit cable out from the pedal unit
E
.
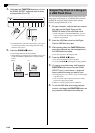
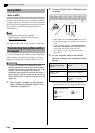
Assembling the Stand
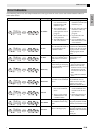
A
Side panel ........................... ×1
B
Side panel ........................... ×1
C
Back board.......................... ×1
D
Screw caps.......................... ×6
E
Pedal unit ............................ ×1
F
Screws ................................ ×2
G
Clips .................................... ×2
H
Brackets .............................. ×2
I
Screw caps ......................... ×2
J
Screws ................................ ×4
K
Back board.......................... ×1
L
Brackets.............................. ×2
M
Screws ................................ ×4
N
Screws ................................ ×3
O
Headphones hook............... ×1
P
Screw.................................. ×1
A
B
D
H
I
F
G
E
C
J
L
M
N
O
P
K
E


Find Your Products By Category
Please Login
