
0
Owner's of the Behringer Stereo System CMD MM-1 DJ Controller Module gave it a score of 0 out of 5. Here's how the scores stacked up:


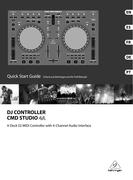
14 15DJ CONTROLLER CMD STUDIO 4A Quick Start Guide
(EN) Step 3: Getting
started
(ES) Paso 3: Puesta en
marcha
(FR) Etape 3 : Mise en
oeuvre
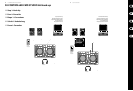
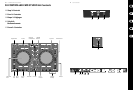
Make the necessary power connections.
• • Connect the CMD STUDIO 4A to the
mains via the provided poweradapter.
Make the necessary audio connections.
• • Connect headphones to the phones
output jack and use the phones output
knob to adjust the volume for monitoring.
• • Connect to external powered speakers or to a PA
mixer via stereo output 1 and use the MAIN knob
to adjust the volume for performance.
• • Connect to an external recording device via
output 2 to capture your performance. Use the
MAIN knob to control the level at output 2.
Make the connections between the
CMDStudio 4A and your computer.
• • Connect the USB type B connector
to the CMD STUDIO 4A and the USB type A
connector to thecomputer.
• • Download and install the necessary ASIO*
driver for use with Windows* operating
systems. Referto the Downloads tab on the
CMD STUDIO 4A product page at www.behringer.
com to acquire the software.
Realice las conexiones correspondientes a
lacorriente.
• • Conecte el CMD STUDIO 4A a la corriente
eléctrica por medio del adaptador incluido.
Realice las conexiones audio adecuadas.
• • Conecte unos auriculares a la toma de
salida PHONES y use el mando PHONES
para ajustar el volumen de monitorización.
• • Conecte esta unidad a unos monitores
autoampli cados exteriores o a un mezclador de
PA a través de la salida stereo 1 y use el mando
MAIN para ajustar el volumen de laactuación.
• • Conecte esta unidad a un dispositivo de grabación
externo a través de la salida stereo 2 si quiere
grabar su interpretación. Use el mando MAIN para
controlar el nivel de volumen de esta salida 2.
Realice las conexiones adecuadas entre el
CMDStudio 4A y su ordenador.
• • Conecte la toma USB de tipo B al
CMDSTUDIO 4A y la toma USB de tipo A
alordenador.
• • Descargue e instale el controlador o driver
ASIO* necesario para usar esta unidad en
sistemas operativos Windows*. Vaya a la
pestaña Downloads de la página de producto
CMD STUDIO 4A en la web www.behringer.com
para descargar dicho software.
Connexion à l’alimentation.
• • Connectez le CMD STUDIO 4A au
secteur avec l’adaptateur fourni.
Connexions audio.
• • Connectez votre casque audio
à l’embase PHONES. Utilisez le
potentiomètre PHONES pour régler le volume
d’écoute.
• • Connectez la sortie stéréo OUTPUT 1 à des
enceintes actives externes ou à la console de
mixage d’un système de sonorisation. Utilisezle
potentiomètre MAIN pour régler le volume
desortie.
• • Connectez la sortie stéréo OUTPUT 2 à un appareil
d’enregistrement externe pour enregistrer votre
performance. Utilisez le potentiomètre MAIN pour
régler le volume de la sortie OUTPUT 2.
Connexions entre le CMD STUDIO 4A et
votreordinateur.
• • Connectez le connecteur USB type B
au CMDStudio 4A et le connecteur USB type A
àl’ordinateur.
• • Téléchargez et installez le pilote ASIO* nécessaire
au fonctionnement avec Windows*. Référez-vous
à l’onglet Downloads de la page du CMD Studio4A
sur le site www.behringer.com pour obtenir
lelogiciel.
DJ CONTROLLER CMD STUDIO 4A Getting started
(DE) Schritt 3: Erste
Schritte
(PT) Passo 3: Primeiros
Passos
Stellen Sie die notwendigen
Netzanschlüsse her.
• • Verbinden Sie den CMD STUDIO 4A
über den mitgelieferten Netzadapter mit
einemNetzanschluss.
Stellen Sie die notwendigen
Audioanschlüsse her.
• • Verbinden Sie Ihre Kopfhörer mit der
KOPFHÖRER-Ausgangsbuchse und stellen Sie mit
dem VOLUME-Regler die Abhörlautstärke ein.
• • Verbinden Sie Stereo Output 1 mit externen
Aktivboxen oder einem PA-Mischer und stellen
Sie mit dem MAIN-Regler die Lautstärke für die
Performance ein.
• • Verbinden Sie Stereo Output 2 mit einem
externen Aufnahmegerät, um Ihre Performance
aufzuzeichnen. Stellen Sie den Signalpegel an
Output 2 mit dem MAIN-Regler ein.
Verbinden Sie den CMD STUDIO 4A mit
IhremComputer.
• • Verbinden Sie den USB Typ
B-Anschluss mit dem CMD STUDIO 4A und den
USB Typ A-Anschluss mit dem Computer.
• • Laden Sie die für Windows*-Betriebssysteme
benötigten ASIO*-Treiber herunter und
installieren Sie sie. Die Software nden Sie unter
www.behringer.com im Download-Tab der
CMD STUDIO 4A-Produktseite.
Faça as conexões de alimentação
necessárias.
• • Conecte o CMD STUDIO 4A à rede
através do adaptador de energia fornecido.
Faça as conexões de áudio necessárias.
• • Conecte fones de ouvido ao
jack de saída PHONES e botão de
saída PHONES para ajustar o volume usado
emmonitoramento.
• • Conecte a alto-falantes alimentados
externamente ou a um PA mixer através da
saída estéreo 1 e use o botão MAIN para ajustar
o volume para performance.
• • Conecte a um aparelho de gravação externo
através da saída estéreo 2 para capturar sua
performance. Use o botão MAIN para controlar o
nível de volume na saída 2.
Faça as conexões entre o
CMD STUDIO 4A e seucomputador.
• • Conecte o conector USB tipo B
ao CMD STUDIO 4A e o conector USB tipo A
aocomputador.
• • Faça o download e instale o necessário driver
ASIO* para uso com sistemas operacionais
Windows*. Veri que o tab Downloads na
página do produto CMD STUDIO 4A no site
www.behringer.com para adquirir o software.


Find Your Products By Category
Please Login
