0

Out of 0 Ratings

Owner's of the JBL Headphones 610 gave it a score of 0 out of 5. Here's how the scores stacked up:
  • Reliability

    0 out of 5
  • Durability

    0 out of 5
  • Maintenance

    0 out of 5
  • Performance

    0 out of 5
  • Ease of Use

    0 out of 5
Page 5
of 68
 
4
The JBL Reference Series 610 is designed for use with iPod generations 4G and above. For your hearing safety, please adjust your iPod volume to the minimum
position prior to powering up your headphones.
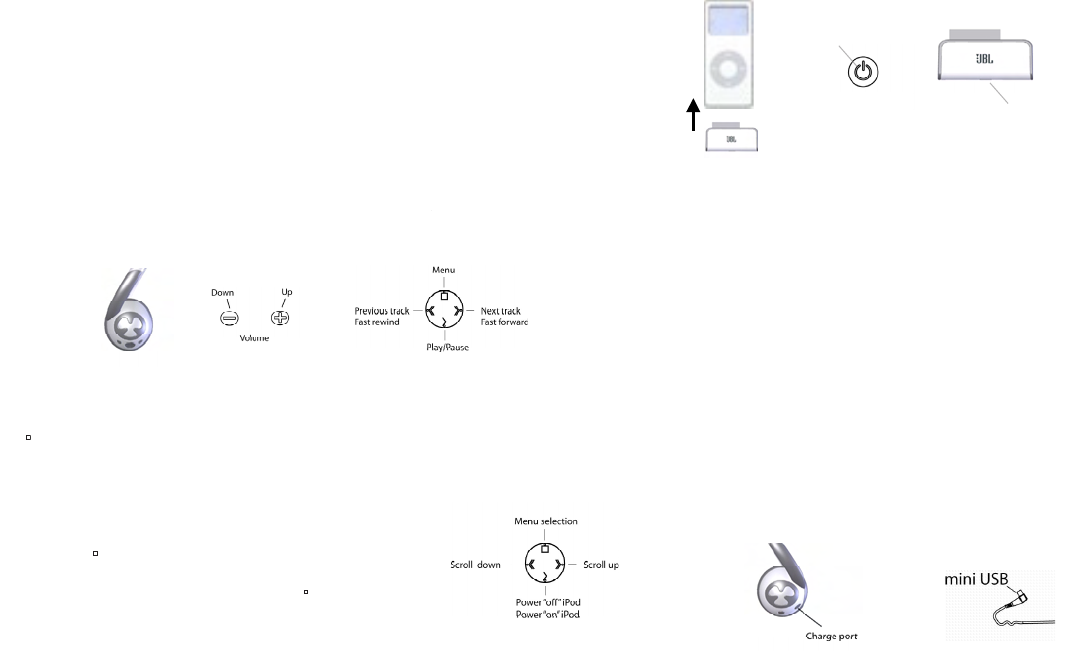
Power “On” your headphones by pressing the power button located on the left ear cup. The blue LED on the headphone will light up (at first solid, followed
by three consecutive, quick flashes – indicating that headphones are ready to be “discovered”). Plug in your dongle after headphone system is in discoverable
mode. The LED on the mating transceiver will start to blink rapidly, indicating pairing with each other. (To power “Off” headphones, press power button.)
Connect the Bluetooth transceiver to the mating Omni connector on the base of your iPod. Connecting the transceiver will automatically power up your iPod.
Once the headphones and Bluetooth transceiver are paired and connected, the blue LED on the headphones and the transceiver’s LED will blink slowly and
intermittently. You are now ready to use your wireless headphone system.
(Note: Pairing of the headphones and transceiver may take up to one minute.)
If Bluetooth connection is lost due to moving out of transmission range, move closer to the iPod and press the play/pause button “>”. It will re-pair to the
Bluetooth transceiver.
1.
2.
3.
4.
Starting Up Your Headphones and the Bluetooth Transceiver
Blue LED
Blue LED
The navigation controls are all conveniently located on the right ear cup.
Navigating Your Headphone Controls
Music Playing Mode
Menu mode brings up a second tier of iPod navigation features, which let you roam through your iPod
menus.
1. Push menu button ( ) once to take you to the menu mode.
2. To scroll “up” (<<) or “down” (>>) the menu, hold down the proper feature button until you reach your
selection.
3. To make a selection from the menu list, push and hold the menu button ( ).
4. In the menu mode, pressing and holding play/pause “>” allows you to turn your iPod on or off remotely
from your headphones.
Menu Mode Features
Menu Mode
Power button
The JBL Reference Series 610 headphones can also be used with other Bluetooth music devices. The
Bluetooth product must be enabled with the A2DP (Advanced Audio Distribution Profile). This will allow
streaming of music to your headphones. A Bluetooth device with both A2DP and AVRCP (Audio/Video
Remote Control Profile) will stream music and allow functionality of the “Music Playing Mode” control
features.
Make sure headphone power is “Off” and transceiver is disconnected from the iPod.
Turn headphone power back “On” and wait for solid LED, then three quick flashes – indicating that the
headphone system is in “discoverable” mode.
To pair your Bluetooth-enabled device to the headphones, please refer to your user’s manual for the
proper setup procedure.
When your audio device requests a passcode to pair with the JBL Reference Series 610 headphone
system, enter the numerical sequence “0000”.
Note: The headphone control features may be limited when used with devices other than your iPod, due to
the varying designs and possible remote control
limitations of your audio device.
1.
2.
3.
4.
For situations when you are not able to use your Bluetooth wireless mode to stream music, the JBL
Reference Series 610 headphones can be connected to your audio device through the included audio
cable. Make sure the volume on your audio device is turned to the minimum position, to ensure hear-
ing safety, prior to connecting your headphones.
1. Turn the power “Off” on your headphones.
2. Plug the mini USB connector on your audio cable into the headphone charging port.
3. Plug the 3.5mm mini stereo jack end into the audio device’s mating port.
4. The control features buttons will not be functional when the headphone system is used with the
audio cable.
Using Your Headphones With Other Bluetooth Devices
Using Your Headphones in Passive Mode
The volume “_” and “+” buttons are controlled by pressing to make your selection. Repeated pressing will reduce or increase volume, as
desired. If you do not notice a change in the volume, make sure your iPod does not have a low battery.
Located on the four-position toggle switch are:
_ ( ) “menu” (push once to take you to menu mode)
_ (<<) “previous track” (push once), “fast rewind” (press and hold)
_ (>>) “next track” (push once), “fast forward” (push and hold)
_ (>) “play/pause” (press once to play, once to pause)
1.
2.
5
troubleshooting your jbl reference series 610
Symptom when used with
Bluetooth transceiver
Possible Problem Solution Note
Sound Quality
Headphone system is not
powered “On”.
Press down power button.
Blue LED should go from solid
to three consecutive, fast blinks,
indicating that it’s ready to be
“discovered” by transceiver or
other audio source.
No sound from headphones.
Rechargeable headphone bat-
tery is low.
Charge headphones by following
the battery charging directions in
this User Guide.
If blue LED on headphones
continues to blink rapidly after
headphone system has paired,
it is indicating a low battery. A
monotone will also be sounded
every 5 seconds for low bat-
tery alert.
Bluetooth transceiver is not
receiving power.
Make sure iPod power is on
and the transceiver connector is
engaged correctly.
Blue LED on transceiver should
start blinking.
iPod battery is low.
Charge your iPod in accordance
with the battery charging
directions given in your iPod
user’s guide.
Bluetooth transceiver is not
connected properly.
Make sure transceiver is
connected properly.
If using audio cable, connection
at mini USB or 3.5mm audio
inlet end may not be connected
properly.
Make sure connectors are mat-
ing correctly to your headphones
and audio device.
Headphone has lost the link with
the Bluetooth transceiver.
1. Press the play/pause button
and the headphone system will
re-pair itself with the transceiver.
2. Move back to within Blue-
tooth connection range.
3. Unplug your transceiver and
replug it in to initiate
connection.
Blue LED should start blinking
rapidly (indicating pairing). You
may have lost the link because
you are too far from the iPod.
Move closer and try again.
No sound from headphones.
Sound comes from only one
side/channel.
Volume is low and will not
increase when “+” feature is
selected.
The iPod may have a low battery. Charge iPod according to iPod
charging instructions.
Your iPod may have a maximum
volume setting that is “On”.
See whether you have iPod
maximum volume setting.
Headphone controls have
intermittent operation.
Bluetooth transceiver is not
connected properly.
Make sure transceiver is
connected properly.
May be moving out of Bluetooth
range.
Move closer to iPod. Bluetooth does not have good
transmission through metal
or water.
The iPod may have a low battery. Charge iPod according to iPod
charging instructions.
Moving out of transmission
range.
Move closer to the iPod or
change position.
Sound drops in and out.
Distortion (static, crackling or
hissing sounds).
Noise may be caused by interfer-
ence from a monitor, cell phone
or other transmitting device.
Turn monitor off to see
whether noise is eliminated. Use
headphones further away from
monitor.
If using audio cable, headphone
system may be overdriven by an
amplified audio source.
Ensure that the JBL Reference
Series 610 is connected to an
appropriate source device. Make
sure cables are inserted snugly
into receptacles. Reduce volume
on the audio source.
Headphone battery is low. Charge headphones by following
the battery charging directions in
this User Guide.
If blue LED on headphones
continues to blink rapidly after
headphone system has paired,
it is indicating a low battery. A
monotone will also be sounded
every 5 seconds for low bat-
tery alert.
Symptom when used with
Bluetooth transceiver
Possible Problem Solution Note
null
  • Add more products to collection
  • Add more products to collection
  • Add more products to collection
  • Add more products to collection
  • Add more products to collection
  • Add more products to collection
  • Add more products to collection
-

Find a Product