

0
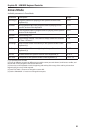
Owner's of the Samson Electronic Keyboard Samson USB MIDI Controller gave it a score of 0 out of 5. Here's how the scores stacked up:


16
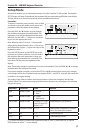
Preset Mode
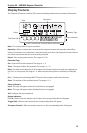
To select a preset, press the PRESET button and the
keyboard will enter Preset Mode. The Preset indicator
will light red, and the Preset number will ash under the
PRESET tag. While in PRESET mode, the Graphite 25 will
stop transmitting MIDI messages.
Use the DATA +/– buttons or numerical keys to select the
desired Preset. The name of the Preset will appear in the
rst row of the display. Press the ENTER button to conrm your choice, and the keyboard will load
the new Preset settings for all slider, knobs and buttons. Pressing the MAIN button will cancel the
selection and return to the previous Preset. There are 3 categories of presets:
GRAPHITE Preset
Preset 1 is congured for the Master Volume slider to control the master volume, and
the encoders to control channel pan and volume for four channels at a time in Zone
1. Using this preset will get you started working with almost any standalone USB/MIDI
device or audio software.
You can edit the Preset for each component in Setup Mode, and save your changes.
The settings for Master Volume slider, encoders E1–E8 and function buttons F1–F4 can
be organized into four banks, which can be accessed by pressing the BANK ◀ or ▶
buttons. The active MIDI channels for all encoders can be shifted up or down by one
channel by pressing the CHANNEL ◀ or ▶ buttons.
Remote Control Presets
Presets 2–16 are designed for specic software titles, with the controls set to access the
most common functions directly from the Graphite 25. The communication between
the computer and the keyboard is bidirectional, and information from the software will
appear on the Graphite’s display. You can edit the Presets in Setup Mode and save your
changes to further customize the parameters to suit your needs.
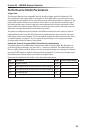
The Master Volume slider is used for master volume control. Encoders E1–E4 are used
for channel pan control; E5–E8 are used for channel volume control. F1–F4 are used
for channel Record for all software. The BANK and CHANNEL buttons are used to
change the channels controlled within the software. The remote control message is
sent through output Port 5 to the computer, and the message from the computer is
received through input Port B of the keyboard.
Note: When you move the master volume slider on the computer, its data will be sent to the
keyboard in real time, and it will be shown on the display, but it cannot aect the physical
position of the slider on the keyboard. When you move the Master Volume slider on the
keyboard, the message will not be transmitted until it reaches the value and position of the
slider in the software. This eliminates any unexpected level jumps when the slider is moved.
User Presets
Presets 17–30 are User presets that can be fully customized to create your layout. The
default settings for each User preset is the same as in Preset 1.
The User Preset also includes information about the contents of settings, for all zones,
and activity status. Zone edit results are saved to the current activated Preset automati-
cally.
+/-


Find Your Products By Category
Please Login
