

0
Owner's of the Samson Electronic Keyboard Samson USB MIDI Controller gave it a score of 0 out of 5. Here's how the scores stacked up:


19
Graphite 25 · USB/MIDI Keyboard Controller
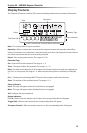
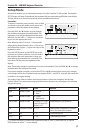
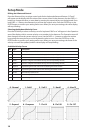
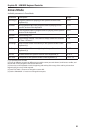
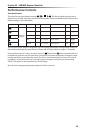
Selecting Velocity Curve for the Trigger Pads
Press the Pad Vel key to select a velocity curve for the trigger pads. “P.Curve” will appear in the Op-
eration area of the display with its current velocity curve number in the data area . The Operation
area will then change to show the current velocity curve. Use the DATA +/– buttons or enter the
number by pressing the numerical keys on the keyboard. Press the ENTER key or the ENTER but-
ton to conrm your setting and save it. The name of the velocity curve will be updated. The value
display will stop blinking. Selectable curves are the same as keyboard velocity curves.
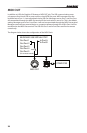
Switch the Local Control
The USB out from port 1 or 2 can be transmitted through the MIDI Out jack. This is controlled
by the local setting. Press the Local key to switch the local control On/O. “Local” and its current
status will appear in the Operation area of the display, and ash. Press the DATA + (or numerical
key 1) to turn Local Control on and DATA – (or numerical key 0) to turn Local Control o. Press the
ENTER key or the ENTER button to conrm your setting and save it. When local is on, “Local” will
appear in the Status Indicator area on the right side of the screen.
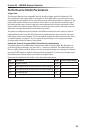
Pedal Setup
Press the pedal to assign a control code for the pedal. “Pedal” will appear in the Operation area of
the display with the value of the current control in the data area. The value is also shown and will
blink under the Val tag on the second row of the display. Use the DATA +/– buttons to change the
value or enter the data by pressing the numerical keys on the keyboard. Press the ENTER key or
the ENTER button to conrm your setting and save it. The value display will stop blinking.
Preset Reset
Press the Preset key to reset to the factory default setting. “Reset No” will appear in the Operation
area of the display and “No” will blink. Press DATA + (or numerical key 1) to switch it to “Yes” or
DATA – (or numerical key 0) to switch it “No.” Press the ENTER key or the ENTER button to conrm
your decision. When the Yes is conrmed, the Reset sign will appear in the Status Indicator area
on the right side of the screen and “Loading…” will appear in the Operation area of the display.
After the reset is nished, the display will show “Reset OK”.
Mute Control
Messages for the operations of the encoders and slider are normally transmitted immediately
with movement of the controller. You can set the Graphite so that it transmits all encoder and
slider movements simultaneously. This is controlled by the MUTE setting. Press the Mute key to
switch the mute control On/O. “Mute” and its current status will appear in the Operation area of
the display and ash. Press DATA + (or numerical key 1) to turn Mute Control on and DATA – (or
numerical key 0) to turn Mute Control o. Press the ENTER key or the ENTER button to conrm
your setting. When mute is on, “Mute” will appear in the Status Indicator area on the right side of
the screen.
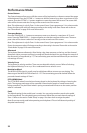
Setup Mode


Find Your Products By Category
Please Login
