
0
Owner's of the Casio Musical Toy Instrument Privia Pro PX-560 Digital Piano gave it a score of 0 out of 5. Here's how the scores stacked up:
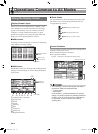
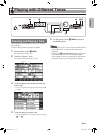

Playing with Different Tones
EN-19
English
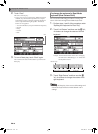
Use this procedure to adjust the volume balance
between the main tone and the layered tone.
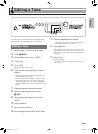
1.
On the screen, touch bp MENU.
This displays the MENU screen.
2.
Touch “BALANCE”.
3.
Touch the tone you want to adjust and then
use the bt w, q buttons to adjust volume.
Upper 1: Main tone
Upper 2: Layered tone
Lower 1: Split (main) tone
Lower 2: Split (layered) tone
4.
On the screen, touch bq MAIN to return to
the MAIN screen.
• For other BALANCE screen settings, see
“BALANCE Screen” under “Configuring Digital
Piano Settings” (pages EN-68 through EN-81).
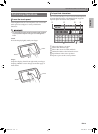
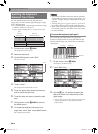
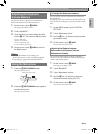
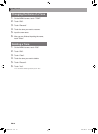
1.
Press the cn METRONOME button.
This starts the metronome.
2.
Press the cn METRONOME button again to
stop the metronome.
This stops the metronome.
You can specify from 0 to nine beats per measure for
the metronome.
Specifying 0 will cause each beat to be indicated by the
same sound. This setting lets you practice with a steady
beat.
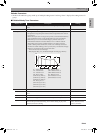
1.
On the MENU screen, touch “SYSTEM
SETTING”.
2.
Touch “Metronome Count”.
3.
Use the bt w, q buttons to select a beats
per measure value.
4.
On the screen, touch bq MAIN.
This returns to the MAIN screen.
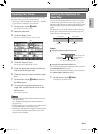
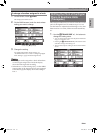
You can use the following procedure to adjust the
volume level of the metronome, without affecting the
volume of keyboard output.
1.
On the screen, touch bp MENU.
This displays the MENU screen.
2.
Touch “BALANCE”.
3.
Touch “Metronome Volume”.
4.
Use the bt w, q buttons to adjust the
metronome volume setting (0 to 127).
5.
On the screen, touch bq MAIN.
This returns to the MAIN screen.
Adjusting the Keyboard
Volume Balance
Using the Metronome
Flashes in time with the beat.
To change the beats per measure
Adjusting the Balance between
Metronome and Keyboard Volume
(Metronome Volume)
PX560-ES-1A.indd 21 2015/06/18 14:53:44


Find Your Products By Category
Please Login
