
0
Owner's of the Casio Musical Toy Instrument Privia Pro PX-560 Digital Piano gave it a score of 0 out of 5. Here's how the scores stacked up:


EN-84
USB Flash Drive
• Be sure to format a USB flash drive on the Digital
Piano before using it for the first time.
• Before formatting a USB flash drive, make sure it
does not have any valuable data stored on it.
• The format operation performed by this Digital Piano
is a “quick format”. If you want to completely delete
all of the data in USB flash drive, format it on your
computer or some other device.
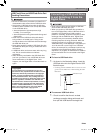
Supported USB Flash Drives
This Digital Piano supports USB flash drives formatted
to FAT32. If your USB flash drive is formatted to a
different file system, use the Windows format function
to reformat it to FAT32. Do not use quick format.
1.
Insert the USB flash drive to be formatted into
the Digital Piano’s USB flash drive port.
2.
On the MENU screen, touch “MEDIA”.
3.
Touch “FORMAT”.
This displays a confirmation message (“Sure?”).
4.
Touch “Yes”.
• The message “Please Wait” remains on the display
while the operation is being performed. Do not
perform any operation while this message is on the
display. “Complete” appears on the display after
formatting is complete.
• To cancel the format operation, touch “No”.
Even when the file format is WAV (general audio data)
or SMF (standard MIDI file), the procedure below can
be used to save data to USB flash drive and play it back
on the Digital Piano.
1.
Connect the USB flash drive to your
computer.
2.
Move the song data file you want to play back
to the MUSICDAT folder on the USB flash
drive.
• For information about playback see “To play along
with data recorded on a USB flash drive” (page
EN-67).
Digital Piano memory data (MIDI recorder songs) can
be saved to a USB flash drive.
• MIDI Recorder songs can be converted to standard
MIDI (SMF) files and stored on the USB flash drive.
• During recording of an Audio Recorder song, the
data is stored directly to the USB flash drive, so the
operation below is not required.
1.
Insert the USB flash drive into the Digital
Piano’s USB flash drive port.
2.
On the MENU screen, touch “MEDIA”.
3.
Touch “Save”.
4.
Touch the data type you want to save.
5.
Touch the data you want to save.
6.
Rename the file as required.
7.
After renaming the file, touch “Enter”.
This displays a confirmation message (“Sure?”). If there
already a file with the same name on the USB flash
drive, a confirmation message (“Replace?”) will appear
asking if you want to overwrite it with the new data.
8.
Touch “Yes”.
• The message “Please Wait” remains on the display
while the operation is being performed. Do not
perform any operation while this message is on the
display. “Complete” appears on the display after
data save is complete.
• To cancel the save operation, touch “No”.
Formatting a USB Flash Drive
Saving Standard Song Data to
a USB Flash Drive
Saving Digital Piano Data to a
USB Flash Drive
PX560-ES-1A.indd 86 2015/06/18 14:53:56


Find Your Products By Category
Please Login
