
0
Owner's of the Casio Musical Toy Instrument Privia Pro PX-560 Digital Piano gave it a score of 0 out of 5. Here's how the scores stacked up:
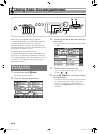

Using Auto Accompaniment
EN-43
English
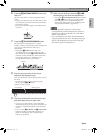
6.
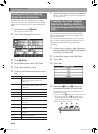
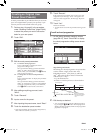
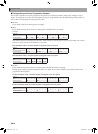
Touch the display item for the instrument part
you want to edit.
Rhythm, tone: Touch the display item and then select
from the list that appears.
To change the settings of items other than those above,
use the bt w, q buttons to change the displayed
value.
• Rhythm patterns are made up of the eight parts
below.
Drums, Percussion, Bass, Chord 1, Chord 2, Chord 3,
Chord 4, Chord 5
• Pressing the bl a button during an editing
operation will sound the accompaniment pattern
with the edits you have made up to that point.
Touching “Solo” will sound only the instrument part
you are editing.
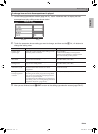
• The table below describes the parameters you can
edit.
7.
After editing is complete, adjust the tempo of
the rhythm as desired.
• The tempo you set here becomes the initial default
tempo.
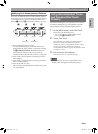
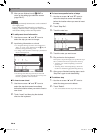
8.
On the screen, touch br EXIT.
9.
Touch “Write”.
This displays a screen for specifying the destination
user rhythm number and rhythm name.
• If you want to exit the editing operation without
saving, touch br EXIT.
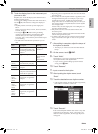
10.
Touch “Rename”.
11.
Input a name for the rhythm.
12.
After inputting the rhythm name, touch
“Enter”.
13.
Touch the destination user rhythm number.
• If the rhythm number already has data assigned to it,
there will be an asterisk (*) next to it.
14.
Touch “Execute”.
If the selected rhythm number does not have any data
assigned to it, the message “Sure?” will appear. If it
does have data assigned to it, the message “Replace?”
will appear.
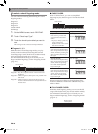
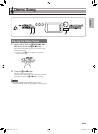
Item Description Setting
Rhythm
(Rhythm)
Replaces the part
accompaniment data with
that of the specified rhythm
number. *
1
Rhythm
number *
2
Part Toggles each part on or off. White:
Part is muted.
Red:
Part sounds.
Tone
(Tone)
Changes the tone
(instrument) for part play.
Tone name *
3
Volume
(Volume)
Controls the volume level of
each part.
000 to 127
Pan (Pan) Controls whether the sound
of the part can be heard from
the left side or right side.
–64 to 0 to 63 *
4
Reverb
Send
(Reverb
Send)
Specifies how much reverb
(page EN-71) is applied to
each part.
000 to 127
Chorus
Send
(Chorus
Send)
Specifies how much chorus
(page EN-71) is applied to
each part.
000 to 127
Delay
Send
(Delay
Send)
Specifies how much delay
(page EN-71) is applied to
each part.
000 to 127
*1 Replacing part accompaniment data clears all edits made
up to that point.
*2 For an intro, the same rhythm number is applied to all of
the eight instrument parts. For example, if you assign
rhythm 003 to Chord 1, rhythm 003 is automatically
assign to the other seven instrument parts as well. If you
later change Chord 2 to rhythm 004, the Chord 1 rhythm
also changes to 004.
Like the intro, all of the eight parts of an ending also are
the same rhythm number.
*3 Only drum set tones can be selected for Drums and
Percussion parts.
Drum set sounds cannot be selected for the Bass and the
Chord 1 through Chord 5 parts.
*4 A smaller value shifts the pan position to the left while a
larger value shifts to the right. A value of zero specifies
center.
Destination user rhythm number
PX560-ES-1A.indd 45 2015/06/18 14:53:48


Find Your Products By Category
Please Login
