
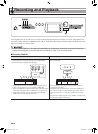
0
Owner's of the Casio Musical Toy Instrument Privia Pro PX-560 Digital Piano gave it a score of 0 out of 5. Here's how the scores stacked up:
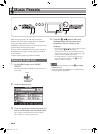

Music Presets
EN-47
English
A music preset editor is provided to allow you to create
your own original music presets (user presets). Up to
100 user presets can be stored in the user group.
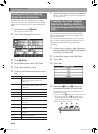
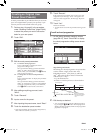
1.
Perform step 1 through 3 in the procedure
under “Recalling Preset Data” (page EN-46)
to select the preset you want to use as the
basis for your user preset.
2.
Touch “Edit”.
3.
Edit the music preset parameters.
4.
After editing everything you want, touch
“Write”.
5.
Touch “Rename”.
6.
Input a name for the preset.
7.
After inputting the preset name, touch “Enter”.
8.
Touch the destination preset number.
• If the preset number already has data assigned to it,
there will be an asterisk (*) next to it.
9.
Touch “Execute”.
If the selected preset number does not have any data
assigned to it, the message “Sure?” will appear. If it
does have data assigned to it, the message “Replace?”
will appear.
10.
Touch “Yes”.
This stores the data.
• To return to the screen in step 8 without saving, touch
“No”.
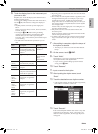
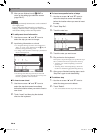
1.
On the editing operation selection screen
(page EN-47), touch “Chord Edit” to display
the chord progression editing screen shown
below.
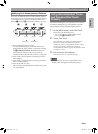
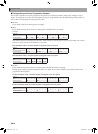
Step (timing and chord)
The timing of a chord progression is expressed as
a series of three values (such as 001:1:00)
indicating measure
*1
(001), beat (1), and tick
(00)
*2
. This series of three values is referred to
collectively as a “step”.
*1 Up to 999 measures
*2 There are 12 ticks per beat, as shown below.
2.
Edit the step as desired.
• You can playback and check the edited progression
by pressing the bl a button. Chord progression
editing cannot be performed while chord progression
playback is in progress.
Creating an Original User
Preset (User Presets)
3-1. To edit the chord progression
Touch “Chord Edit” to display the chord
progression editing screen.
Next, perform the editing operation described
under “To edit a chord progression” (page
EN-47). After you are finished, touch br EXIT to
return to the screen above.
3-2. To change how an Auto Accompaniment is
played
Touch “Parameter Edit” to display the parameter
editing screen.
Next, perform the editing operation described
under “To change how an Auto Accompaniment
is played” (page EN-49). After you are finished,
touch br EXIT to return to the screen above.
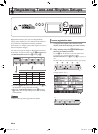
To edit a chord progression
Step (timing and chord)
01 02 09 10 1100
Chord progression
Measure 1
Beat 1 Beat 2 Beat 3 Beat 4 Beat 1 Beat 2
Tick
001:1:00
002:1:00
For the sample display
above, the chord change
from C to Am7 occurs
here.
Measure 2
PX560-ES-1A.indd 49 2015/06/18 14:53:49


Find Your Products By Category
Please Login
