
0
Owner's of the Pioneer DJ Equipment Pioneer DJ Equipment gave it a score of 0 out of 5. Here's how the scores stacked up:

En
11
Operation
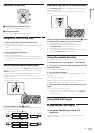
RHYTHM FX section
A
U
D
I
O
E
F
F
E
C
T
I
N
S
T
R
U
M
E
N
T
OVER
DUB
EXIT
AUTO
4-BEAT
SEQUENCER
RHYTHM FX
BPM
V
B
R
LEVEL
DELETE
K
I
C
K
S
N
A
R
E
C
L
A
P
H
I
H
A
T
C
Y
M
B
A
L
O
F
F
S
E
T
D
E
L
A
Y
R
E
V
A
D
D
T
R
A
N
S
R
O
L
L
INSTRUMENT
1
1
3
6
7
2 45
2
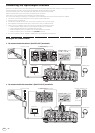
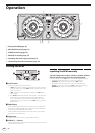
1 RHYTHM FX buttons
These turn the RHYTHM FX effects on and off.
2 RHYTHM FX indicator
This flashes when an effect is on.
3 RHYTHM FX control
This adjusts the selected RHYTHM FX effect.
4 DELETE button
This button can be used to delete the operations of the
[RHYTHM FX] buttons that were recorded using the 4-BEAT
SEQUENCER function, one button at a time.
5 Internal sound source volume adjustment buttons
These adjust the volume of the internal sound sources.
6 EXIT button
This lights when the 4-BEAT SEQUENCER function is on.
When the button is pressed, the 4-BEAT SEQUENCER function turns
off.
7 OVERDUB button
The 4-BEAT SEQUENCER function turns on.
The operations of the [RHYTHM FX] buttons are recorded and the
sound is played in a loop.
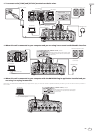
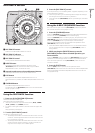
Using the RHYTHM FX function
1 Press one of the [RHYTHM FX] buttons.
Select the RHYTHM FX effect type.
The button that was pressed flashes.
! Internal sound sources are preset at each of the [KICK], [SNARE],
[CLAP], [HI HAT] and [CYMBAL] buttons.
! For details on the types of effects, see the Pioneer DJ support site
below.
http://pioneerdj.com/support/
2 Turn the [RHYTHM FX] control.
The effect is applied to the sound.
— The strength of the effect increases when the control is turned
clockwise. The strength of the effect is maximum when the con-
trol is turned fully clockwise.
— The strength of the effect decreases when the control is turned
counterclockwise. When turned fully counterclockwise, the
original sound is output, with no effect applied.
3 Press the [RHYTHM FX] control.
A sound processing or sound adding effect is applied, depending on the
type of effect that is selected.
! The sound processing or sound adding effect changes according to
the strength with which the control is pressed in.
! When the selected [RHYTHM FX] button is pressed again, the effect
turns off.
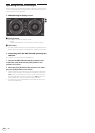
Using the 4-BEAT SEQUENCER function
The order and timing at which the [RHYTHM FX] buttons are pressed
are recorded and the sound is played in a loop.
1 Press the [OVERDUB] button.
When the [OVERDUB] button is pressed, the 4-BEAT SEQUENCER func-
tion turns on and the [OVERDUB] button flashes brightly.
While the [OVERDUB] button is flashing brightly, the operations of the
[RHYTHM FX] buttons are recorded and loop playback continues.
When the [OVERDUB] button is pressed again, it starts flashing
dimly and loop playback continues, but additional operations of the
[RHYTHM FX] buttons are not recorded.
! When the 4-BEAT SEQUENCER function is on, RHYTHM FX effects
are only applied while the corresponding [RHYTHM FX] button is
being pressed.
2 While pressing the [DELETE] button, press the
[RHYTHM FX] button whose recorded operation you
want to delete.
When the [DELETE] button is pressed, the [RHYTHM FX] buttons whose
operations are recorded light. When a lit button is pressed, the button
turns off and the operation of that [RHYTHM FX] button which was
recorded is deleted.
3 Press the [EXIT] button.
When the [EXIT] button is pressed, all the operations of the
[RHYTHM FX] buttons that were recorded with the 4-BEAT SEQUENCER
function are deleted. The 4-BEAT SEQUENCER function turns off and
loop playback stops.


Find Your Products By Category
Please Login
