
0
Owner's of the Pioneer DJ Equipment Pioneer DJ Equipment gave it a score of 0 out of 5. Here's how the scores stacked up:

En
13
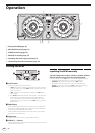
Operation
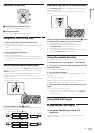
RELEASE FX section
RELEASE FX
ECHO BACK
SPIN
VINYL
BRAKE
1
2
1 RELEASE FX type selection button
This switches the type of RELEASE FX effect.
2 RELEASE FX button
These turn the RELEASE FX effects on and off.
Using the RELEASE FX function
1 Press the [RELEASE FX] type selection button.
Select the RELEASE FX effect type.
! For details on the types of effects, see the Pioneer DJ support site
below.
http://pioneerdj.com/support/
2 Press the [RELEASE FX] button.
This turns the effect on.
The effect is applied to the sound.
! When you release your finger from the button, the effect turns off.
The RHYTHM FX and SCENE FX effects that were on up to this point
also turn off.
Switching the audio signal path
The audio signals input to this unit’s [INPUT] terminals pass through
the effect circuitry inside this unit and are then output from this unit’s
[OUTPUT] terminals.
This unit’s effect circuitry includes three sections, positioned in the
following order: the RHYTHM FX section, the SCENE FX section, and the
RELEASE FX section.
Of these three effect sections, the order of the RHYTHM FX and SCENE
FX sections can be inverted.
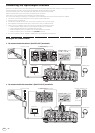
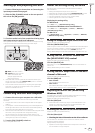
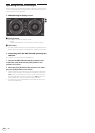
SIGNAL FLOW
1
23
Press the [SIGNAL FLOW] (1) button.
The audio signal path switches as shown on the diagram below each
time the button is pressed.
—
When the right indicator (2) is lit
INPUT
OUTPUT
RHYTHM FX SCENE FX
RHYTHM FXSCENE FX
RELEASE FX
— When the left indicator (3) is lit
INPUT
OUTPUT
RHYTHM FX SCENE FX
RHYTHM FXSCENE FX
RELEASE FX
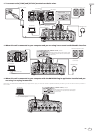
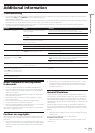
Customizing the effect parameters
The [CUSTOMIZE SHIFT] button can be used to customize the param-
eters of this unit’s effects.
The customized parameters are immediately reflected in this unit’s
operation.
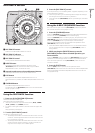
CUSTOMIZE SHIFT
1
While pressing the [CUSTOMIZE SHIFT] button (1), press
the button of the effect you want to customize.
The type and beat of the respective effect switches.
! The effect type and beat can only be customized while the
[CUSTOMIZE SHIFT] button is being pressed.
! Buttons that are not lit cannot be customized.
! For the RELEASE FX function, the selected effect’s beat switches
each time the [RELEASE FX] button is pressed.
Using the update function
! Do not turn off this unit’s power during the updating procedure.
1 Connect this unit to your computer via a USB cable.
2 Turn on this unit’s power while pressing the [AUTO]
and [TAP] buttons.
This unit starts up in the updating mode.
3 Run the update software.
The update software can be downloaded from the Pioneer DJ support
site below.
http://pioneerdj.com/support/
When a dialog box indicating that the update has been completed is
displayed on the computer, the update is complete.
4 Briefly turn this unit’s power off and then turn it on
again.
This unit starts with the updates applied.
! If an error occurs during updating, the type of error is indicated by
the BPM display and the number of segments of the [SCENE FX]
indicator that are lit.
Using RMX-500 Plug-in
Setting the RMX-500 Plug-in
Launch the RMX-500 Plug-in in the host
application
For instructions on launching the plug-in, see the host application’s
operating instructions.


Find Your Products By Category
Please Login
