
0
Owner's of the Pioneer DJ Equipment Pioneer DJ Equipment gave it a score of 0 out of 5. Here's how the scores stacked up:

En
9
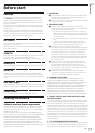
Before start
Starting up and preparing this unit
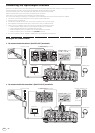
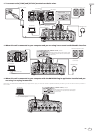
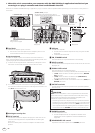
1 Connect following the instructions at Connecting the
input/output terminals on page 6.
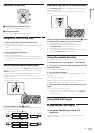
2 Slide the [ON, STANDBY] switch on the rear panel of
this unit to the [ON] position.
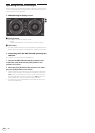
3 Check the audio level of the sound that is being input
and output using the peak level indicators.
The brightness and color of the peak level indicators change according
to the audio level of the sound that is being input and output.
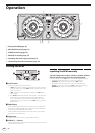
AUTO
BPM TAP
IN
NUDGE
PEAK OUT
1
2
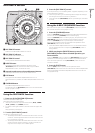
1 INPUT peak level indicator
2 OUTPUT peak level indicator
Green: Permissible level
Orange: Appropriate level
Red: Excessive level
! If the peak level indicator lights red, the audio level of the input
sound is too high. Switch the [SIGNAL LEVEL] switch or lower the
output level of the connected device.
! This unit does not have a function for adjusting the input/output
audio level. To adjust the input/output audio level, operate the
devices connected to this unit.
Connecting this unit and computer
1 Connect this unit to your computer via a USB cable.
This unit functions as an audio device conforming to the ASIO
standards.
! This operation does not work with computers that do not support
USB 2.0.
!
The computer’s recommended operating environment depends on
the DJ application. Be sure to check the recommended operating
environment for the DJ application you are using.
! When another USB audio device is connected to the computer at the
same time, it may not operate or be recognized normally.
We recommend only connecting the computer and this unit.
! When connecting the computer and this unit, we recommend con-
necting directly to this unit’s USB port.
2 Turn the [ON, STANDBY] switch on.
Turn on the power of this unit.
About the setting utility software
The setting utility can be used to make the checks and settings
described below.
— Setting the headphone output source of this unit
— Setting the link of master volume and the [HEADPHONES VOL] control
— Setting the MIDI output ON/OFF and MIDI channel of this unit
— Adjusting the buffer size (when using Windows ASIO)
— Checking the version of the driver software
Displaying the setting utility
For Windows 8
Click [Start] menu > [RMX-500 Settings Utility].
For versions of Windows other than Windows 8
Click [Start] menu > [All Programs] > [Pioneer] > [RMX-500] >
[RMX-500 Settings Utility].
For Mac OS X
Click [Macintosh HD] icon > [Application] > [Pioneer] > [RMX-500]
> [RMX-500 Settings Utility].
Setting the headphone output source of this unit
Display the setting utility before starting.
Click the [HEADPHONES] tab.
When using this unit as an audio device, set either the audio data output
from this unit to the computer, or the audio data input from the com-
puter to this unit as the audio output from [PHONES] terminal.
Factory default settings are audio data input from the computer to this unit.
Setting the link of master volume and
the [HEADPHONES VOL] control
Display the setting utility before starting.
Click the [MASTER] tab.
Set whether to link the [HEADPHONES VOL] control to the master vol-
ume or not.
Factory default setting is not to link them.
Setting the MIDI output ON/OFF and MIDI
channel of this unit
Display the setting utility before starting.
Click the [MIDI] tab.
! MIDI CHANNEL
Sets the MIDI channel for this unit.
! MIDI OUTPUT
Sets whether MIDI data is output from this unit to the computer or not.
Factory default setting is not to output MIDI data.
Adjusting the buffer size (when using
Windows ASIO)
If an application using this unit as the default audio device is running,
quit that application before adjusting the buffer size.
Display the setting utility before starting.
Click the [ASIO] tab.
! If the buffer size is made large, drops in audio data (breaks in the
sound) occur less easily, but the time lag due to the delay in the
transfer of the audio data (latency) increases.
Checking the version of the driver software
Display the setting utility before starting.
Click the [About] tab.
Checking the latest information on the driver software
For information on the latest version of the driver software, see the
Pioneer DJ support site below.
http://pioneerdj.com/support/
! Operation cannot be guaranteed when multiple units of this mixer
are connected to a single computer.


Find Your Products By Category
Please Login
