
0
Owner's of the Pioneer DJ Equipment Pioneer DJ Equipment gave it a score of 0 out of 5. Here's how the scores stacked up:


En
5
Before start
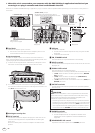
7 Proceed with installation according to the instructions
on the screen.
If [Windows Security] appears on the screen while the installation is
in progress, click [Install this driver software anyway] and continue
with the installation.
! When the installation program is completed, a completion message
appears.
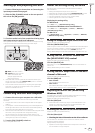
Installation procedure (Mac OS X)
Read Cautions on Installation carefully before installing the driver
software.
! To install or uninstall the driver software, you need to be authorized
by the administrator of your computer. Have the name and password
of the administrator of your computer ready in advance.
1 Click [Software Download] under [RMX-500] on the
Pioneer DJ support site.
2 Click [Driver Software].
3 From the download page, download the driver
software for Mac OS (RMX-500_M_X.X.X.dmg).
4 Double-click the downloaded file.
The [RMX-500_AudioDriver] menu screen appears.
5 Double-click [RMX-500_AudioDriver.pkg].
The driver installation screen appears.
6 Check the details on the screen and click [Continue
Anyway].
7 When the end user license agreement appears, read
Software end user license agreement carefully, then click
[Continue Anyway].
8 If you consent to the provisions of the Software end
user license agreement, click [Agree].
If you do not consent to the provisions of the Software end user license
agreement, click [Disagree] and stop installation.
9 Proceed with installation according to the instructions
on the screen.
! Click [Cancel] to cancel installation after it has started.
Installing RMX-500 Plug-in
This software is a plug-in for enabling functions of the RMX-500 to be
used on music creation applications. In order to use this software, the
plug-in must be running on a host application that supports the plug-in
(VST, Audio Units or RTAS
®
).
! A computer equipped with an Intel
®
Core™ 1.4 GHz or greater CPU
is recommended for using this software.
! Use a computer on which the host application operates stably.
! For the operating requirements of the host application, see your host
application’s operating instructions or website.
Checking the latest information about the RMX-500
Plug-in
For up-to-date RMX-500 Plug-in information, see the Pioneer DJ support
site below.
http://pioneerdj.com/support/
Cautions on Installation
! If installation of this software has been interrupted, start installation
over from the beginning following the procedure below.
! Read Software end user license agreement carefully before installing
this software.
! Quit any other programs that may be running on the computer
before installing this software.
! This software is supported on the operating systems below.
Supported operating systems
Windows
Windows
®
8/Windows
®
8 Pro
32-bit version
1
64-bit version
1
Windows
®
7 Home Premium/
Professional/Ultimate (SP1 or later)
32-bit version
1
64-bit version
1
Windows Vista
®
Home Basic/
Home Premium/Business/Ultimate (SP2
or later)
32-bit version
1
64-bit version
3
Intel Mac
Mac OS X 10.8 64-bit version
1
Mac OS X 10.7
32-bit version
1
64-bit version
1
Mac OS X 10.6
32-bit version
1
64-bit version
1
!
Operation is not guaranteed when multiple units of the RMX-500 are connected
to a single computer.
About the installation procedure (Windows and
Mac OS X)
Read Cautions on Installation carefully before installing this software.
! Authorization of the computer’s administrator is required to install
and uninstall this software.
Log on as the user which was set as the computer’s administrator
before installing.
1 Click [Software Download] under [RMX-500] on the
Pioneer DJ support site.
2 Click [RMX-500 Plug-in].
3 Download RMX-500 Plug-in for Windows, or RMX-500
Plug-in for Mac OS from the download page.
4 Double-click the downloaded file.
The RMX-500 Plug-in installation screen appears.
5 When the language selection screen appears, select
[English] and click [OK].
! You can select the one you desire from multiple languages as long
as the language is supported by the system environment of your
computer.
6 When the license agreement screen appears, read the
Software end user license agreement carefully. If you
agree to the Software end user license agreement, click
[Agree].
! If you do not consent to the provisions of the Software end user
license agreement, click [Disagree] and stop installation.
7 Follow the instructions on the screen to install this
software.
! Click [Cancel] to cancel installation after it has started.
! For Windows, specify the folder containing the host application’s VST
plug-in as the location for installing the VST plug-in.
!
If the plug-in is installed according to default settings, files are
placed in the following folders.
—
Mac OS X
VST:/Library/Audio/Plug-Ins/VST/
AU:/Library/Audio/Plug-Ins/Components/
RTAS:/Library/Application Support/Digidesign/Plug-Ins/
— 32-bit version of Windows
VST:\Program Files\Pioneer\RMX-500 Plug-in
RTAS:\Program Files\Common Files\Digidesign\DAE\Plug-Ins
— 64-bit version of Windows
VST:\Program Files (x86)\Pioneer\RMX-500 Plug-in
RTAS:\Program Files (x86)\Common Files\Digidesign\DAE\
Plug-Ins


Find Your Products By Category
Please Login
