
0
Owner's of the Shure Microphone Wireless System gave it a score of 0 out of 5. Here's how the scores stacked up:
10
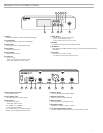
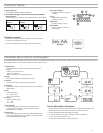
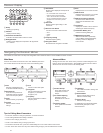
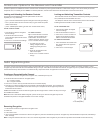
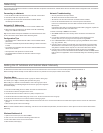
Receiver Display
group channel rf audio gain
scan
network
menu
power
gain
dB
TV
OL TxOL
MHz
hr mn
1 2 3 4 5
6
7
8910111213
14
15
① Group
Displays group setting.
② Channel
Displays channel setting.
③ Active Antenna Indicator
Illuminates to indicate which antenna is active.
④ RF Signal Meter
Number of bars displayed corresponds to RF signal level -
OL = overload.
⑤ Audio Meter
Number of bars displayed corresponds to
audio level.
- OL = Illuminates when receiver audio
limiter is active to prevent clipping
-
TxOL = Illuminates when transmitter
input is overloaded. Reduce input from
microphone or instrument to prevent
clipping.
⑥ Gain Level
Displays receiver gain setting in 1 dB
increments.
⑦ Receiver Lock Status
Lock icon and name of locked control:
- menu
- power
- gain
⑧ Frequency Setting
Selected frequency (MHz).
⑨ Encryption Status
Illuminates when encryption is enabled.
⑩ Scan
Displayed when scan function is active.
⑪ Network Scan
Displayed when network scan function
is active in multi-receiver systems.
⑫ Network Connection Indicator
Illuminates when additional Shure
components are detected on the
network.
⑬ TV Channel
Displays the number of the TV channel
containing the selected frequency.
⑭ Transmitter Battery Icon
Indicates remaining battery life.
⑮ SB900 Battery Runtime
When the transmitter is powered by
a Shure SB900 rechargeable battery,
remaining runtime is displayed in
hours:minutes.
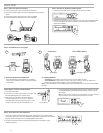
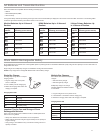
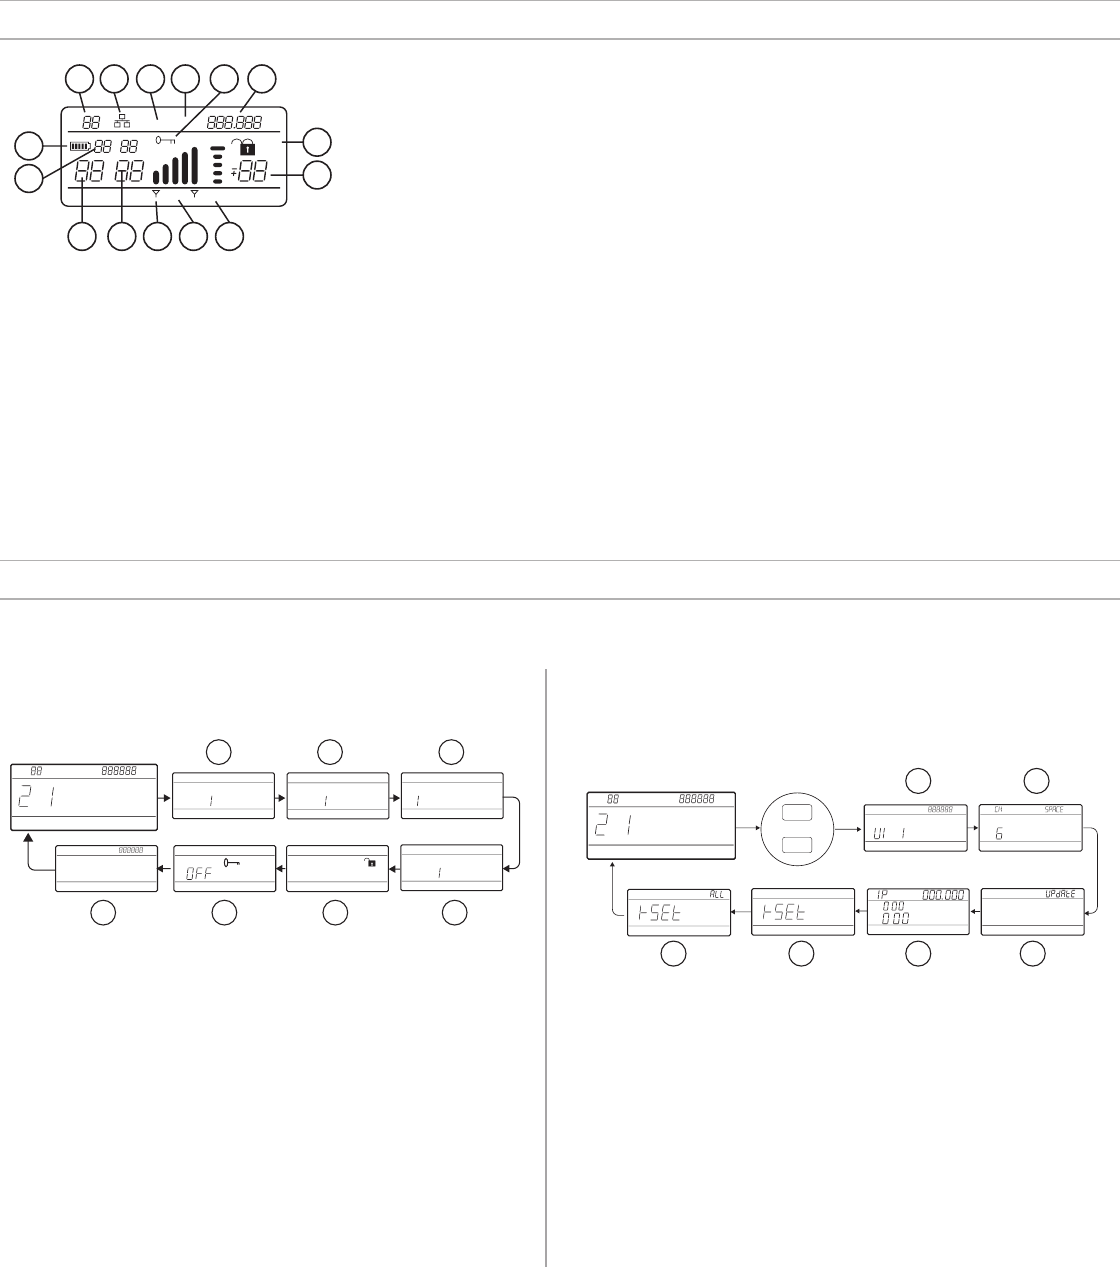
Navigating the Receiver Menus
The receiver has a main menu for setup and configuration and an advanced menu to access additional receiver functions.
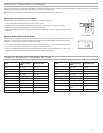
Main Menu
Press the menu button to access the menu. Each additional press of the
menu button advances to the next menu screen in the following order:
MH z
T V MHz
group channel
T V MHz
audiorf gain
I
I
I
I
I
I
I
I
I
I
I
I
I
I
I
I
I
I
I
I
I
I
I
gr ou p
I
I
I
I
I
I
I
I
I
I
I
I
I
I
I
ch anne l
scan
I
I
I
I
I
I
I
I
I
I
I
I
I
I
I
channel
networ k scan
I
I
I
I
I
I
I
I
I
I
I
I
I
I
I
channel
I
I
I
I
I
I
I
I
I
I
I
I
I
I
I
1 2 3
4567
① Scan
Receiver automatically scans
for the best available frequency
② Network Scan
Scans to find frequencies for
networked receivers operating
in the same frequency band
③ Group
Edit the receiver group settings
④ Channel
Edit the receiver channel
settings
⑤ Lock
Choose a control lock option
⑥ Encryption
Use the arrow buttons to enable
encryption (on) or disable
encryption (off)
⑦ Frequency
Use the arrow buttons to edit the
frequency value
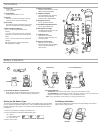
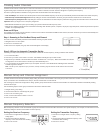
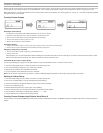
Advanced Menu
Starting from the main menu home screen, press menu while holding the enter
button to access the advanced menu. Each additional press of the menu button
advances to the next menu screen in the following order.
TV MHz
group channel
TV MHz
audiorf gain
MHz
group channel
I
I
I
I
I
I
I
I
I
I
I
I
I
I
I
netw ork
menu
enter
+
TV MHz
1 2
3456
① Custom Groups
Use to add channels and
frequencies to Custom
Groups
② TV Channel Spacing
Selects the regional
bandwidth for TV channel
display
③ Firmware Update
Use to update the transmitter
firmware
④ IP Settings
Use to select and edit IP settings and
subnet masks
⑤ Network Reset
Returns network settings and IP
address to default setting
⑥ Factory Reset
Restores factory settings
For application and configuration details,
see the related guide topic for each
advanced feature.
Tips for Editing Menu Parameters
• To increase, decrease or change a parameter, use the arrow buttons
• A menu setting will blink when editing is enabled
• To save a menu change, press enter
• To exit a menu without saving a change, press menu
• To access the advanced menu, press menu while holding the enter button from the home screen
• To return to the home screen from any menu without saving changes, press and hold the menu button.


Find Your Products By Category
Please Login
