
0
Owner's of the Tascam MP3 Player DP-32SD 32-Track Digital Portastudio gave it a score of 0 out of 5. Here's how the scores stacked up:

TASCAM DP-32SD 19
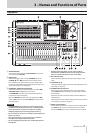
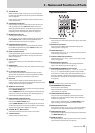
3 – Names and Functions of Parts
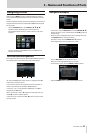
g JOG/DATA dial
When the Home screen is open, you can use this dial for
transport jog operations. (See “Cueing with the JOG/DATA
dial” on page 43.)
Use this dial to change parameter values and select items
when using menus.
h ASSIGN button/indicator
Use this button to set the track type for tracks 9/10–31/32
and set (assign) the input (INPUT A to H) for each track.
When you press this button, the Assign screen opens. The
input signal of the assigned input source becomes the
recording source. (See “Assigning inputs” on page 33.)
j MIXER button/indicator
Press to open the Mixer screen.
On this screen, you can adjust the settings for the selected
input (INPUT A to H) or track (including GROUP) that is
selected. (See “Bouncing tracks” on page 41.)
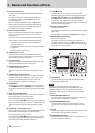
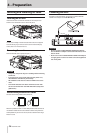
k DYNAMICS button/indicator
Pressing this button opens a screen to adjust the settings
for the effects applied to the inputs (INPUT A to H). (See
“Dynamic effects” on page 52.)
l EFFECT button/indicator
Pressing this button opens a screen to make adjustments
to the effects. (See “Guitar effects” on page 52 and “Send
effects” on page 53.)
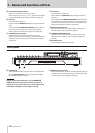
; MENU button
Press to open the
MENU
screen. (See “Menu structure” on
page 22.)
z HOME button
Press to open the Home screen. (See “Home screen” on page
21.)
x F1 to F4 (function) buttons
The functions of these buttons depend on the currently
open screen. The functions currently assigned to the F1 to
F4 buttons are shown at the bottom of the screen.
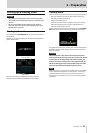
c PAN knob
Use this knob to adjust the stereo position of the track's
playback signal or the input signal assigned to that track. (See
“Stereo position (panning)” on page 54.)
v SEND EFF 1/EFF 2 knobs
Use these knobs to adjust the amount of track signal output
to the EFFECT SENDS jacks.
Use the SEND EFF 1 knob also to adjust the amount of track
signal sent to the internal effects. (See “Sending signals to
internal/external effects” on page 36.)
b SEND MASTER 1/MASTER 2 knobs
Use these knobs to adjust the amount of master track signal
output to the EFFECT SENDS jacks.
Use the SEND MASTER 1 knob also to adjust the amount of
master track signal sent to the internal effects. (See “Sending
signals to internal/external effects” on page 36.)
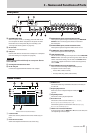
n CURSOR (5/b/g/t) buttons
Use these buttons to move the cursor on the screen.
m JOG PLAY button
Press to switch to Search mode.
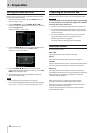
Operation buttons
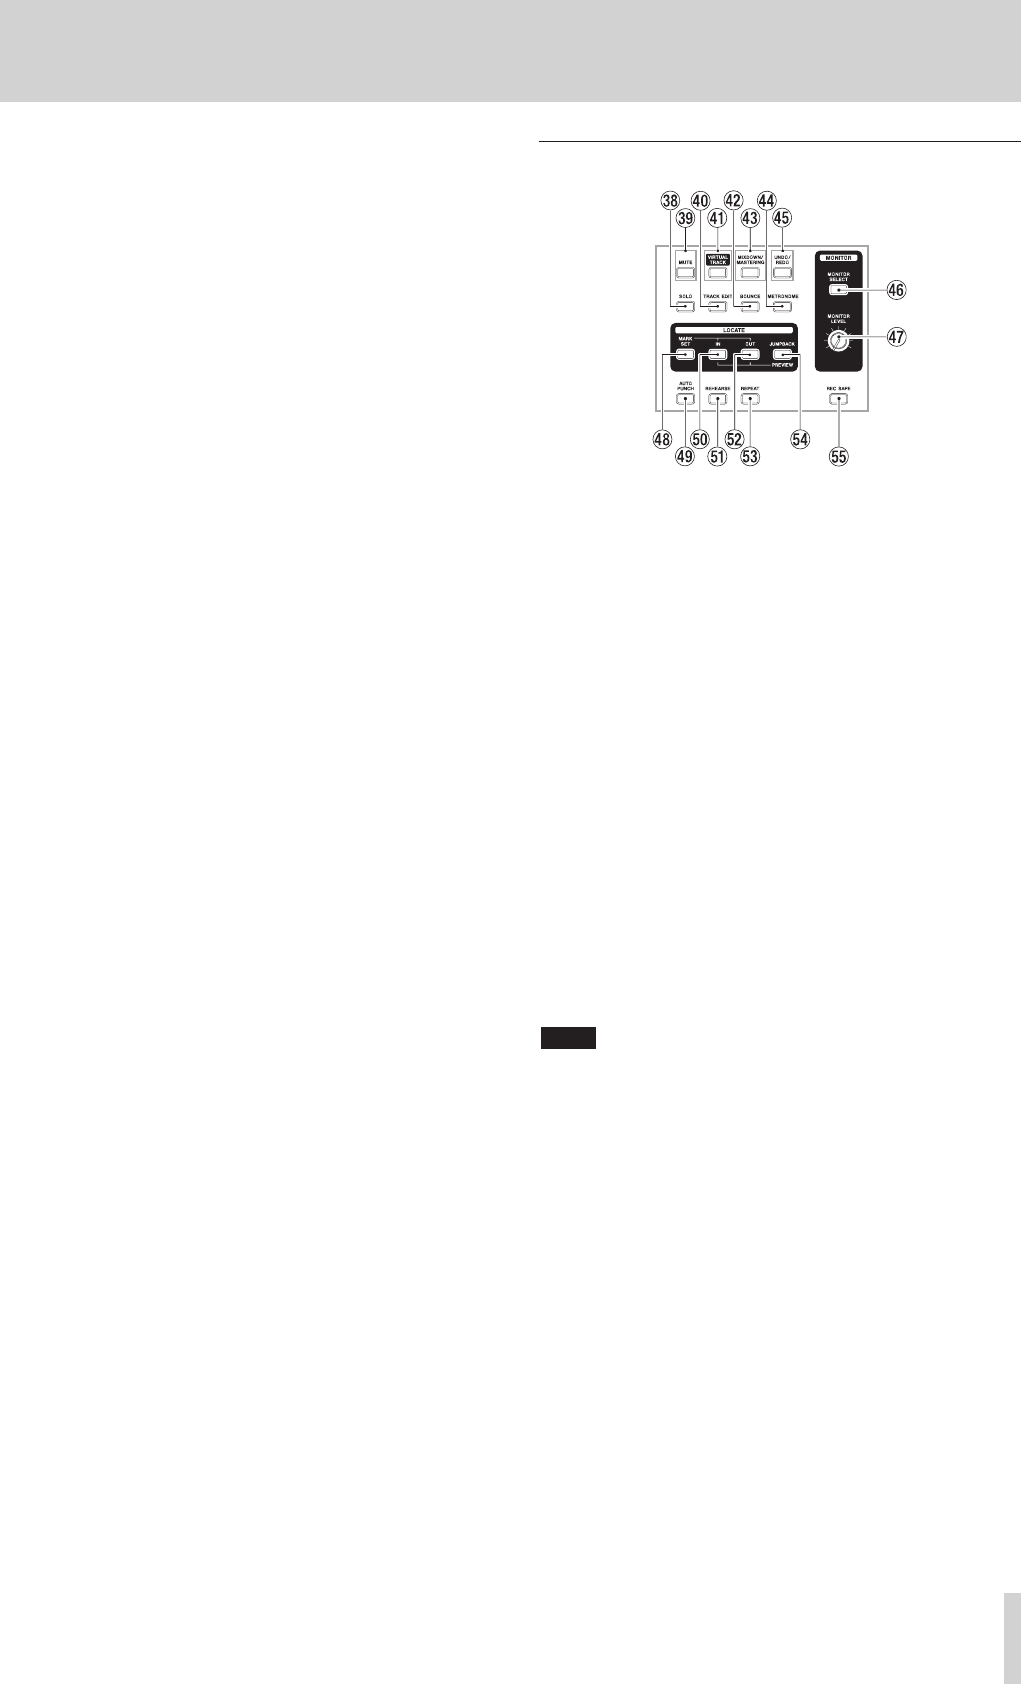
, SOLO button/indicator
Press to switch to Solo mode (the button lights). (See “Solo”
on page 37.)
. MUTE button/indicator
Press to switch to Mute mode (the button lights). (See
“Muting tracks” on page 37.)
/ TRACK EDIT button
Press to open the
TRACK EDIT
screen. (See “Overview of
track editing” on page 48.)
! VIRTUAL TRACK button/indicator
Press to open the
VIRTUAL TRACK
screen. (See “Virtual
tracks” on page 47.)
@ BOUNCE button/indicator
Press to switch to Bounce recording mode (the button
lights). (See “Bouncing tracks” on page 41.)
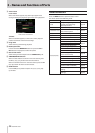
# MIXDOWN/MASTERING button/indicator
Press to cycle through the
Multi Track
,
Mixdown
and
Mastering
modes. Mastering mode is only available
when there is a master track. (See “Mixing down tracks” on
page 54, “Creating a master file” on page 55, “Checking
the master file” on page 56 and “Using the mastering tools”
on page 56.)
NOTE
The current mode is shown on the Home screen.
$ METRONOME button/indicator
Press to set the metronome.
The button flashes in time with the set tempo. (See
“Metronome” on page 59.)
% UNDO/REDO button/indicator
Press to undo the immediately previous action (single
undo) or to cancel the last undo (redo). (See “Undoing an
operation” on page 39.)
After a single or multiple undo, the UNDO/REDO button
lights, showing that an operation has been undone.
^ MONITOR SELECT button
Press to open the
MONITOR SELECT
pop-up window on
the Home screen. (See “Monitor selection” on page 34.)
& MONITOR LEVEL knob
Use this knob to adjust the level of the signals output from
the MONITOR OUT jacks.
* MARK SET button
During recording or playback, press to set a mark manually.
(See “Setting a location mark” on page 43.)


Find Your Products By Category
Please Login
