
0
Owner's of the Tascam VCR DR-70D 4-Channel Audio Recorder for DSLR Cameras gave it a score of 0 out of 5. Here's how the scores stacked up:

6
TASCAM DR-70D
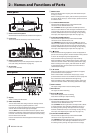
2 – Names and Functions of Parts
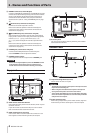
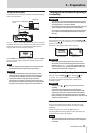
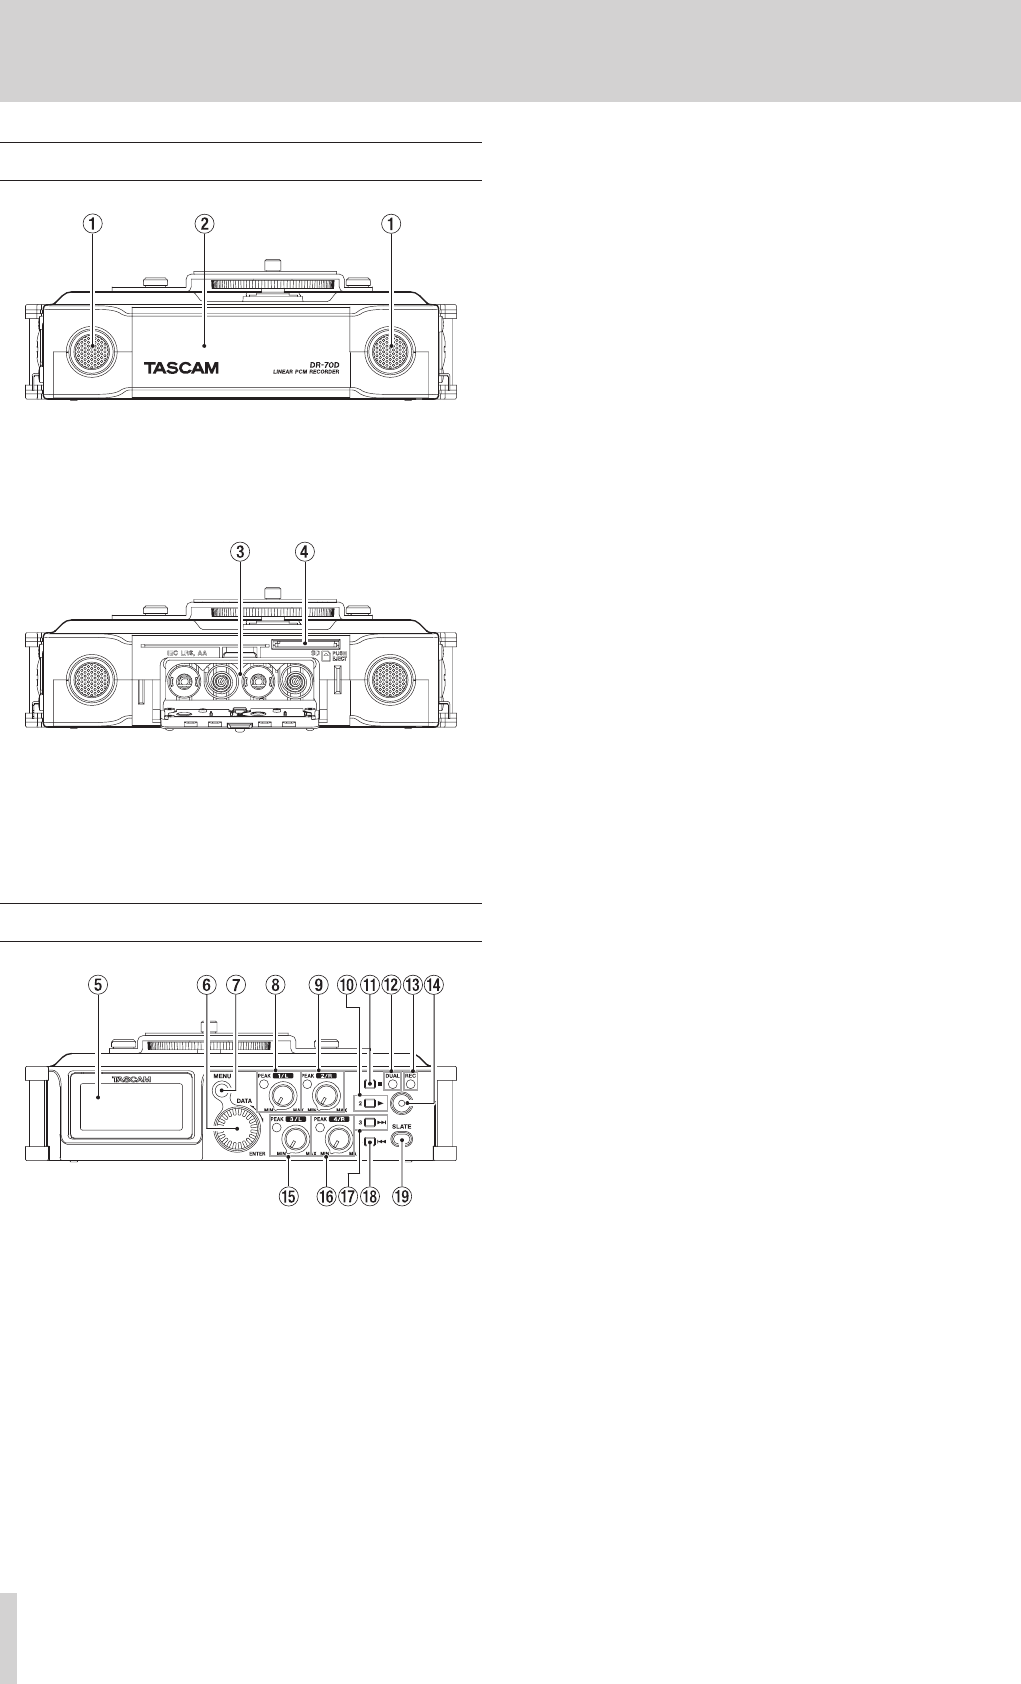
Front panel
1 Built-in stereo microphone
Omnidirectional stereo electret condenser microphone.
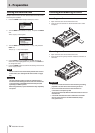
2 Front cover
This is the cover for the battery case and SD card slot.
3 Battery compartment
Install batteries (4 AA) in this compartment to power the
unit. (See “Using AA batteries” on page 12.)
4 SD card slot
Insert an SD card here.
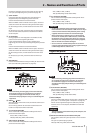
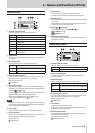
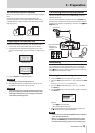
Rear panel
5 Display
Shows a variety of information.
6 DATA dial (ENTER)
Turn to select items and change values on setting screens.
Use also to change the playback position in a file.
Push this dial to confirm selections on setting screens and to
answer “YES” to confirmation pop-up messages.
Turn the DATA dial while the Home Screen is open to move
between the positions of slate tones that have been inserted
in the file. If no slate tone has been inserted in the file, doing
this will move to the next file.
Press and hold this dial when stopped to switch the signal
monitored.
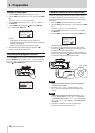
7 MENU button
When the Home Screen is open, press this button to open
the
MENU
screen.
When a setting screen is open, press to move up one level in
the menu. When the
MENU
screen is open, press to return to
the Home Screen.
8 1/L knob and PEAK indicator
Use this knob to adjust the input level from the 1/L
connector on the left side of the unit.
The 1/L PEAK indicator lights when the 1/L input level is
about to cause distortion. This also lights if distortion occurs
in the analog circuitry during mic input. This will not light,
however, if distortion occurs in the analog circuitry during
line input. (See “Adjusting the input level” on page 19.)
9 2/R knob and PEAK indicator
Use this knob to adjust the input level from the 2/R
connector on the left side of the unit.
The 2/R PEAK indicator lights when the 2/R input level is
about to cause distortion. This also lights if distortion occurs
in the analog circuitry during mic input. This will not light,
however, if distortion occurs in the analog circuitry during
line input. (See “Adjusting the input level” on page 19.)
0 1/8 button
Press this button during playback to cause the playback to
pause at the current position. Press this button when paused
to return to the beginning of the playback file.
Press this button during recording to stop recording.
When the BASIC screen or INPUT screen is open, use this to
select the channel to which the setting items shown apply.
When a setting screen is open, press this button to return
to the Home Screen. Use this button to answer “NO” to a
confirmation message.
q 2/7 button
When the Home Screen is open and playback is stopped,
press this button to start playback.
When a file or folder is selected in the
BROWSE
screen,
press this button to return to the Home Screen and play that
file or the first file in the folder from the beginning.
When the BASIC screen or INPUT screen is open, use this to
select the channel to which the setting items shown apply.
w DUAL indicator
This lights orange when in dual recording mode.
e REC indicator
This lights red when recording.
r Record (0) button
Press when stopped to start recording.
Press when recording to stop recording.
t 3/L knob and PEAK indicator
Use this knob to adjust the input level from the 3/L
connector on the left side of the unit.
The 3/L PEAK indicator lights when the input level is about
to cause distortion. This also lights if distortion occurs in
the analog circuitry during mic input. This will not light,
however, if distortion occurs in the analog circuitry during
line input. (See “Adjusting the input level” on page 19.)
y 4/R knob and PEAK indicator
Use this knob to adjust the input level from the 4/R
connector on the right side of the unit.
The 4/R PEAK indicator lights when the input level is about
to cause distortion. This also lights if distortion occurs in
the analog circuitry during mic input. This will not light,


Find Your Products By Category
Please Login
