
0
Owner's of the Tascam VCR DR-70D 4-Channel Audio Recorder for DSLR Cameras gave it a score of 0 out of 5. Here's how the scores stacked up:


8
TASCAM DR-70D
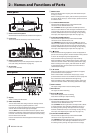
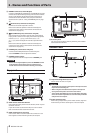
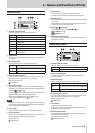
2 – Names and Functions of Parts
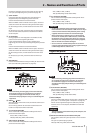
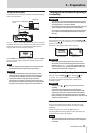
j REMOTE connector (2.5mm TRS jack)
Connect a TASCAM RC-3F footswitch or TASCAM RC-10 wired
remote control (both sold separately) here to enable remote
starting and stopping of playback and other functions. A
remote control can be used to start, stop and otherwise
operate the unit. (See “9 – Using the REMOTE jack” on page
36.)
k IN connector (3.5mm stereo mini jack)
Connect to the audio output of a camera.
Refer to the camera’s operation manual to identify this
connector on the camera. (See “Camera connection and
attachment” on page 16.)
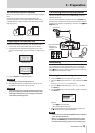
l OUT/LINE OUT jack (3.5mm stereo mini jack)
Use a stereo mini jack cable to connect this to the external
input jack of a camera or line input jack of other equipment.
Use the
OUTPUT LEVEL
item on the
MONITOR
SETTING
screen to adjust the volume output from this
jack.
Refer to the camera’s operation manual to identify this
connector on the camera. (See “Camera connection and
attachment” on page 16.)
; PHONES jack (3.5mm stereo mini jack)
Connect stereo headphones to this stereo mini jack.
Use the PHONES control to adjust the volume.
z PHONES volume control
Use to adjust the volume output from the PHONES jack.
CAUTION
Before connecting headphones, lower the PHONES volume
to the minimum level. Failure to do so could result in a
sudden loud noise that could harm hearing, for example.
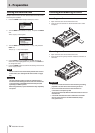
Top panel
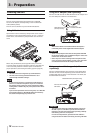
x DSLR camera attachment bracket
Use a DSLR mounting screw with this bracket, which is prein-
stalled on the unit.
If you do not want to use this bracket, use a coin or other
tool to remove the four attachment screws.
c DSLR mounting screw (1/4-inch)
Use to attach this unit to the bottom of a camera or a rack
that supports camera mounting screws, for example.
v Accessory shoe
You can use the accessory shoe by removing the included
DSLR attachment bracket
Bottom Panel
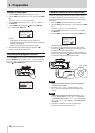
b Tripod mounting thread (1/4-inch)
Use to attach this unit to a tripod.
CAUTION
•
Tighten the unit securely to the tripod or microphone stand
to prevent it from falling off.
•
When using this unit attached to a tripod or microphone
stand, place the tripod or stand on a level surface.
•
Some tripods have different screw specifications that make
direct connection impossible. Use a commercially-available
adapter with such tripods.
n Video camera pin hole
When using a tripod with a pin for video cameras, align this
hole with the pin when attaching the unit to the tripod.


Find Your Products By Category
Please Login
