

0
Owner's of the Yamaha Music Mixer Yamaha Music Mixer gave it a score of 0 out of 5. Here's how the scores stacked up:


MGP32X/MGP24X Owner’s Manual
29
Using Graphic EQ
Linking the right and left stereo signals
You can edit the right and left channels together by linking the
right and left stereo signals. In the initial state, the link is set to
“ON.” Disabling the link allows you to set parameters separately
for the right and left channels.
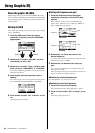
1. Press the GEQ button below the display
repeatedly if necessary until the GEQ MODE
page appears.
2. Rotate Knob 1 to select “L/R Link”, and then
rotate Knob 2 to set to “ON.”
The parameter value flashes.
3. Press Knob 2 while the parameter value is
flashing.
The screen prompts you to reset the gain.
4. Press Knob 2 again to select “OK,” or Knob 1
to cancel.
The gain will be reset, and the link setting is executed. The
indication on the upper right side of the GEQ EDIT and the
GEQ SWEEP screens changes to “L/R.”
Clearing the link setting
1. In step 2 above, change the parameter value
from “ON” to “OFF.”
2. While the parameter value is flashing, press
Knob 2.
The screen prompts you to confirm “Break Link?”
3. Press Knob 2 again to select “OK,” or Knob 1
to cancel.
The link is disabled.
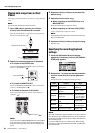
Finding and removing feedback
Using the offset gain lets you check the feedback point in
advance, and feedback can be reduced by correcting the gain with
GEQ.
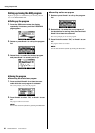
1. Press the GEQ button below the display
repeatedly if necessary until the SWEEP page
appears.
If the “L/R Link” is set to “ON,” the “SWEEP L/R” page
appears. If the “L/R Link” is set to “OFF,” the “SWEEP Lch”
page or “SWEEP Rch” page appears.
2. Rotate Knob 2 to specify the rough offset
value.
Raise the gain temporarily by using the offset setting to create
a situation with no feedback margin, and find the feedback
point.
3. Rotate Knob 1 slowly to find the feedback
point.
You will start to hear feedback when the frequency reaches
the feedback point.
4. When the feedback point is found, rotate Knob
2 to lower the offset to a minus value in order
to reduce feedback.
5. When the final adjustment has been made,
press Knob 2.
Offset will be added only to the setting value of the adjusted
frequency.
6. Repeat steps 2 -5 as necessary to adjust the
GEQ settings.
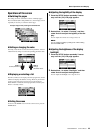
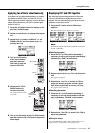
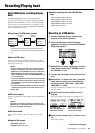
Frequency
Offset
14BandGEQ
Offset
Flex9GEQ
* Actual gain
-4.0dB=
-10dB+6.0dB
* Actual gain = parameter (setting) value + offset
* Actual gain
+4.5dB=
-1.5dB+6.0dB
Frequency


Find Your Products By Category
Please Login
